
Remove old headliner board, clean surface, spray adhesive, apply new fabric carefully.
If you want a clean, quiet cabin and a factory look, you can do it yourself. I will show you how to replace car headliner fabrics with simple tools, clear steps, and pro tips.
I have restored many sagging headliners over the years. Follow along, and you will learn the exact method that lasts for years, not months.

Why the headliner matters and when to replace it?
A headliner is more than a trim panel. It adds insulation, reduces road noise, and covers wiring. It also frames your view and affects how the cabin feels.
You should replace it when the fabric sags, smells, or stains. Foam dust on seats is a sign that the foam has turned to powder. If glue fails in heat, the fabric will bubble and drop. Replace early to save the board and avoid a bigger job.
A clean headliner helps resale and comfort. It is a weekend task for most cars. With care and the right fabric, you can get a factory-level finish at home.

Tools and materials you need
Gather everything before you start. A tidy setup saves time and stress.
You will need:
- Fabric: foam-backed headliner fabric, wide enough for your board
- Adhesive: high-temperature spray adhesive rated for auto interiors
- Backer: optional thin poly sheet or drop cloth for masking
- Hand tools: screwdrivers, trim tools, socket set
- Cutters: fresh utility blades or scissors
- Brushes: soft nylon brush and a small stiff brush
- Clean-up: isopropyl alcohol, microfiber towels
- Sanding: 120–220 grit sandpaper or Scotch-Brite pad
- Tape: painter’s tape for edges and masking
- Rollers: a small vinyl roller or clean paint roller
- Safety: gloves, mask or respirator, and eye protection
Check your car’s service guide for clip and trim locations. This helps avoid broken tabs and hidden screws.

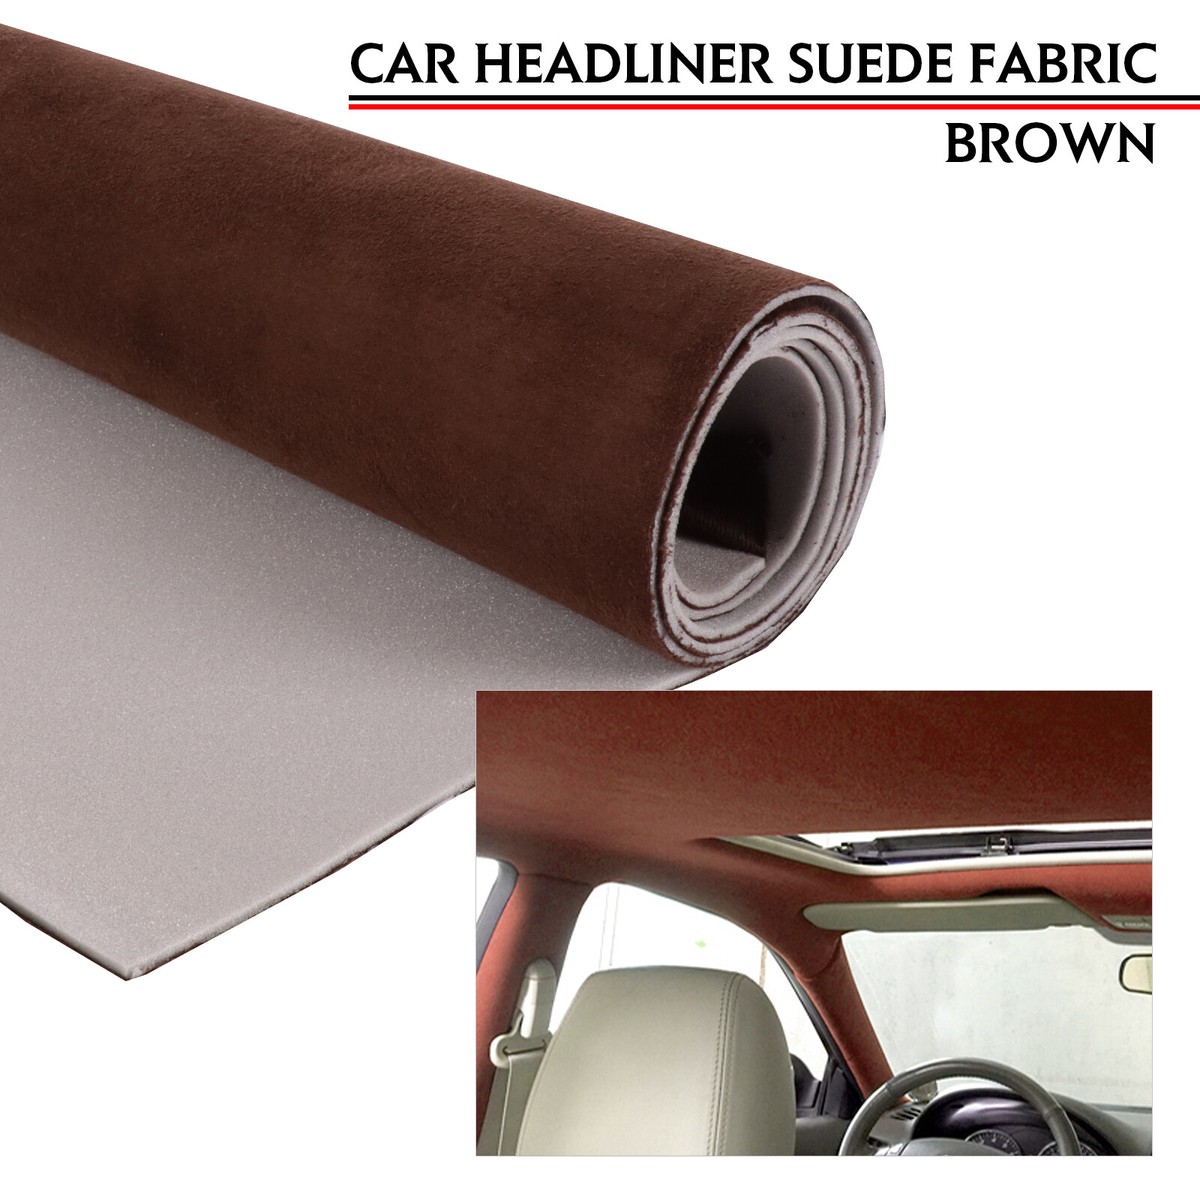
Choosing the right headliner fabric and adhesive
Pick the same texture and color as your cabin if you want a stock look. Foam-backed headliner fabric bends well and hides small flaws. Most cars use 1/8 inch foam. Larger boards and SUVs may look better with 3/16 inch foam.
Do not reuse the old fabric. The backing foam has failed. New fabric is cheap compared to your time.
Use a high-temp spray adhesive that can handle summer heat. Aim for 160°F to 200°F heat resistance or higher. A headliner adhesive or a high-strength trim adhesive works well. I use two light coats on both surfaces. Let it tack before bonding.
Buy more fabric than you think you need. Extra inches help wrap edges and fix errors. For most sedans, 2 yards by 60 inches wide is enough. Big trucks and vans may need 3 yards.

Prep and safety
Park in a clean, dry, well-lit space. Open doors and have room to move the board out. Lay down a clean blanket to protect the board.
Unhook the battery if your car has side curtains or roof airbags. Wait a few minutes. This lowers risk when you remove trim near sensors and wiring.
Wear a mask and gloves. Old foam turns to dust fast. Spray glue fumes are strong. A respirator rated for organic vapors is best. Keep pets and kids away from the area.
Step-by-step: how to replace car headliner fabrics
This is the core process. Take your time. Read all steps before you begin.
- Remove trim and fixtures
- Remove dome lights, grab handles, sun visors, visor clips, coat hooks, and pillar trims.
- Unplug wiring for lights, microphones, and sensors.
- Keep screws in labeled bags to stay organized.
- Drop and remove the headliner board
- Pull the front and rear edges free.
- Tilt and slide the board out a door or hatch. Use two people if space is tight.
- Do not bend the board hard. It can crack.
- Strip the old fabric
- Peel off the old fabric gently. It should lift with light force.
- Do not saturate with water. It weakens the board.
- Clean the board
- Use a soft brush to remove all foam dust.
- Sand lightly to remove loose residue and bumps.
- Vacuum and wipe with isopropyl alcohol. Let it dry.
- Test-fit the new fabric
- Lay the fabric face-up over the board.
- Make sure the grain and color look right in light.
- Leave 2–3 inches extra around all sides.
- Glue in halves
- Fold the fabric back halfway.
- Spray adhesive on the board half and the fabric backing. Light, even coats.
- Wait until tacky to the touch, not wet. Usually 2–5 minutes.
- Bond and smooth
- Starting at the center, lay the fabric down.
- Use your hand or a clean roller to smooth out to the edges.
- Work slowly to avoid wrinkles and bubbles. Do not stretch the fabric hard.
- Repeat on the other half
- Fold back the unglued half and repeat the spray and lay process.
- Keep a steady pace so the first side does not over-cure before contact.
- Wrap edges and cut openings
- Wrap the fabric around edges and press down.
- Cut X-shaped slits at holes for lights and handles.
- Tuck edges clean. Avoid cutting too wide. Sneak up on the cut.
- Let it cure
- Let the board sit flat for at least an hour.
- Warm, dry air helps. Do not bake it in direct sun yet.
- Reinstall the board
- Slide it back in with help if needed.
- Reconnect wiring. Test dome lights and microphones.
- Reinstall all trim, visors, handles, and clips in reverse order.
- Final check
- Look for loose edges and press again.
- Wipe any glue haze with a light solvent on a cloth.
These steps show how to replace car headliner fabrics with a clean, strong bond. The key is prep, adhesive control, and gentle hands. Small moves win here.

Special cases: sunroofs, antennas, airbags, and fragile boards
Sunroof headliners have added cutouts and sliding panel boards. Mark openings before you glue. Support thin areas with care. Do not over-cut near the cassette opening.
Roof antennas and shark fins sit under the headliner. Unplug and unbolt them from the roof skin. Seal gaskets as needed during reassembly. Water leaks start here if you rush.
Cars with side curtain airbags need extra caution. Some trims cover deploy paths. Do not block airbag paths with extra foam or fabric. Keep the original thickness near airbag edges.
Old fiberglass or pressed boards can get brittle. If a corner cracks, repair with a thin layer of epoxy and a light cloth. Let it cure before fabric. Avoid heavy fillers that add weight.

Common mistakes and how to avoid them
Too much glue makes ridges and fails in heat. Use two light coats, not one heavy coat. Tacky, not wet, is the rule.
Stretching fabric tight looks good at first but lifts later. Lay and pat, do not pull. Work from the center and chase air out.
Skipping foam removal is the fastest way to a do-over. Remove all old foam. The new bond must grab the board, not dust.
Cutting holes too big ruins the look. Make small slits, test-fit, and open more as needed. Sharp blades make clean cuts.
Rushing cure time causes slips and bubbles. Give the adhesive time to set. A calm hour now saves you days later.

Cost, time, and skill level
Most DIY jobs cost between 60 and 200 dollars for fabric and glue. Large vehicles or premium fabrics cost more. Shops may charge 250 to 600 dollars or higher.
Time varies by model. Plan 3 to 6 hours for a first-time job. Two people make removal and reinstallation faster and safer.
Skill level is moderate. You need patience and clean habits. If you can handle basic trim work, you can do this. Learning how to replace car headliner fabrics is a great first upholstery task.
Care and maintenance after replacement
Keep the cabin dry and clean. Damp air harms foam over time. Fix window and sunroof leaks fast.
Avoid harsh cleaners on the new fabric. Use a soft brush and a light upholstery cleaner for spots. Blot, do not rub hard.
Try to park in shade during summer. Less heat means longer life for the foam and glue. A sunshade can help on hot days.
Troubleshooting: fixes after install
If you see small bubbles within a day, warm the spot with a hair dryer on low. Press and hold with a clean pad until cool. Do not overheat.
If edges lift, mask the area and apply a small amount of spray adhesive with a straw or brush. Press and hold. A small roller helps lock the bond.
If stains bleed through, it may be old glue or foam dust. Spot clean with a light upholstery cleaner. In rare cases, a redo is needed if contaminants were left on the board.
These quick fixes show how to replace car headliner fabrics with lasting results when little issues pop up.
Professional tips from the field
I have replaced dozens of headliners for daily drivers and classics. A few habits make the job smooth.
- Label every screw and clip by location. Bag them and note L or R when needed.
- Photograph wiring and trim before removal. One picture can save an hour.
- Keep glue at room temperature. Cold cans spit and make heavy blobs.
- Use a clean sheet of cardboard as a spray mask. It gives sharp edges and saves cleanup.
- Practice on a small trim piece first. Get your spray pattern and tack timing right.
If you follow these tips, how to replace car headliner fabrics becomes a calm, repeatable process. Your results will look pro and hold up in heat and time.
Checklist for better results and planning
If you plan to share your project online, a simple checklist helps others. It also reminds you of key steps on your next job.
- Note your fabric type, width, and yardage.
- Record your adhesive brand and heat rating.
- List the tools that worked best for tight spots.
- Track total time and any tricky steps on your model.
- Share before-and-after photos and lessons learned.
Writing and sharing your own guide on how to replace car headliner fabrics builds confidence. It also helps the next person avoid common mistakes.
Frequently Asked Questions of how to replace car headliner fabrics
How long does it take to replace a headliner?
Most first-time DIY jobs take 3 to 6 hours. Larger vehicles or sunroofs add time.
What is the best glue for headliners?
Use a high-temperature spray adhesive rated for auto interiors. It should resist summer heat and not soften.
Can I reuse my old headliner fabric?
No. The foam has failed and will not bond well. Always use new foam-backed fabric.
Do I need to remove the headliner board from the car?
Yes. Proper cleaning, wrapping, and cuts require the board out. In-car fixes rarely last.
How do I avoid wrinkles and bubbles?
Glue in halves, start at the center, and work out. Use light, even pressure and do not stretch the fabric.
Will airbags or sensors make this unsafe?
Disconnect the battery and follow trim removal steps. Do not block airbag paths or alter sensor mounts.
How much fabric do I need?
Most sedans need about 2 yards at 60 inches wide. Trucks, vans, and SUVs may need 3 yards.
Conclusion
You can fix a sagging roof and refresh your cabin in one weekend. With the right fabric, a high-temp adhesive, and calm steps, the result looks factory and lasts. This guide showed how to replace car headliner fabrics with simple tools and a clean method.
Plan your tools, prep the board well, and take your time with the glue. That is the difference between a short-term patch and a long-term win. Ready to start? Gather your materials, follow the steps, and share your results or questions in the comments.